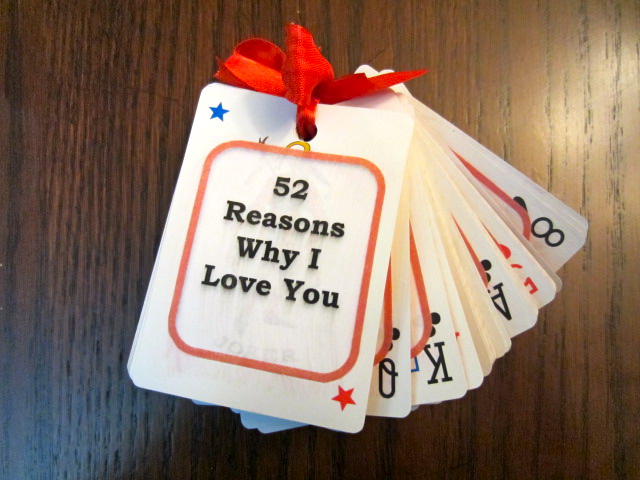
So this year, for Darran's (hubby) birthday I decided to do some things I found on Pinterest. The first thing I did was the "52 Reasons I Love You" on playing cards. In my sleep-deprived-due-to-a-new-baby mind, I forgot to take pictures of the projects in progress so you're just getting the end results. :) Here is the "52 Reasons ...":
And the following 3 pictures show some of the reasons I gave:
Now, I need to say, all of the tutorials I found said that white glue doesn't stick to glossy playing cards so the paper won't stick that way and they are right. However, their solution is to get sandpaper, sand down the cards, and then use white glue to attach the paper with your reason to the card. That sounded too time-consuming for a mom of a 2-year-old and a new born, and too messy as well. So I did some thinking and remembered how wonderfully modge podge adheres to pretty much anything you can think of. That's what I used - no sandpaper needed. So here's my tutorial:
Materials needed:
1 deck of playing cards
hole punch
list of reason you love your man (or woman)
reasons put on paper squares/rectangles (I used Word to do this and I made the rectangles about 5 cm by 6 cm.)
ribbon or something to attach the cards together
modge podge
sponge brush to spread modge podge
scrap paper or card board to put under project to protect your surface when using modge podge
Directions:
1. Get your deck of playing cards. Keep the jokers (I used them for the covers of the "book"), the 2 "instructional" cards that come in the deck are good practice cards to test where you want to punch the hole or holes).
2. Print off your reasons (after you type them out in to whatever shape you choose on Word). Cut these out.
3. Hole punch the cards in the area you want (after practicing on the practice cards).
4. Spread modge podge on your paper, stick it to the card and spread another layer of modge podge over that to seal it. (It worked perfectly.)
5. When dry, stack in order you want, and connect with ribbon or other method you choose (some use binder rings).
It's pretty simple and ends up being a pretty special gift (at least Darran seemed to think it was pretty special so I guess I achieved my goal with that). :)
Now, that wasn't his only birthday gift. That was the birthday card. After I compiled a list of 52 reasons I love him, I chose about 8 of them to represent with applicable gifts. Darran quite liked the gifts I chose for him. One of them was another Pinterest project so I will post it here. :)
This is a DIY canvas print. This gift went with the "you are a great father" reason of the "52 Reasons ..." project (a picture of him and our oldest daughter).
Materials needed:
8 x 10 canvas
tissue paper (or tracing paper) cut to 8 x 10 size and made flat
modge podge (and brush)
computer with pictures (and an idea of which picture you want) :)
Directions:
1. Choose a picture to print and print it on the tracing paper. Spread modge podge on the canvas. Quickly (and carefully) place the picture on the canvas, ensuring it's centred and quickly spread the air bubbles out (but don't panic if you can't get them all out).
2. Allow it to dry slightly and then spread a layer of modge podge on top (spread thinly as it will cause the ink to bleed a bit ... but that just enhances the cool look of it in the end).
3. Now you might be starting to panic (as I did) if you see bubbles in the middle of the picture that you just weren't able to get out and you might think the whole thing looks like crap. DON"T WORRY! Put it away the the rest of the day, even overnight. When it's fully dry, look at it again and it might (will probably) be just fine. That's what happened to me. I was in a full state of panic and hid it in my closet, the next morning I pulled it out and it was just fine. All the bubbles had flattened out and the whole thing was perfectly stuck to the canvas. You now have a DIY canvas print.
Darran thought it looked pretty cool and was super please to get a gift like that. I want to do another one of him and our newest baby girl. :)
So, since this is a post about the birthday, thought I'd put in all the pictures of Darran opening his gift. :)
This is the bucket with all the gifts wrapped (and the reason written on the outside of the package). The deck of cards is in the envelope. :)